Monday, December 22, 2008

How to convert a PDF file to Word, Excel or JPG format

One common question I’ve run across a lot these days in the office is how to convert a PDF file to Microsoft Word format (doc), Excel format (xls), or JPG picture format. Usually, people want to know how to convert a file to PDF, but it’s also nice to be able to convert back the other way. Converting to Word is actually pretty simple and can be done directly using an online file conversion service called Zamzar. Going to Excel or JPG is a two step process, but nothing very difficult to follow.

Update: There’s a much easier way to convert a PDF to JPG image format than the method I have mentioned below. Here’s how you can do it using Zamzar.com.

Convert a PDF file to JPG - Easy Way

Go to ZamZar.com, browse for your file and choose PNG format for the format to conver to under Step 2. PNG is another newer picture format that is slowly replacing the JPG format. Most programs that can open JPG files can open PNG. Zamzar automatically converts each page in the PDF document into it’s own PNG picture file. Now you can simply open Microsoft Paint (yes, all you need it Paint!) and choose File - Save As from the menu and choose JPEG from the drop down list of formats.

microsoft paint

That’s it! By the way, if youare interested in how to extract the text from a PDF document or how to convert Word files to PDF, etc, check out the links.

Convert PDF to JPG Format - Second Way

The first thing you’ll need to do is download a free software (the only one I could find) that converts PDF documents to JPEG image format automatically. Go to the Omniformat download page and download both Omniformat v8.3 and the PDF995 app. You will need to download and install PDF995 first before installing Omniformat. Once you have both programs installed, go to your Start Menu programs, find the program group Software995 and click on Omniformat.

software995.jpg

The only annoying thing about this program is that it requires you to view some ads for about 30 seconds! However, it’s better than paying $20 or $40 for a program just to do a simple conversion! It does pop up another instance of your browser window for the web site of each of the sponsors, but it does not install any spyware onto your computer (no popup ads). Once the program is loaded, you’ll see it has a section called “Watch Folders” and then a button at the bottom titled “Start Monitoring” and “Single Pass“.

pdf-to-jpg.jpg

Basically the way it works is that you need to COPY the PDF files you want to convert to JPG format to the C:\omniformat\watch folder and then press Single Pass. The program will look in that directory and convert each page of each PDF into a separate JPG file. If you click Start Monitoring, you can keep dropping PDFs into that folder and the program will automatically convert them into JPGs as long as the program is open. Note that the program DELETES the original PDF document that it uses, so that’s why you need to COPY the PDF document to the watch folder, not move it! You should now see your converted files like below:

pdf-to-jpg-convert.jpg

Convert your PDF to a Word document

Go to Zamzar.com and click the Browse button next to Step 1 and choose your file. By default, Step 2 will be set to DOC format, but you can choose to convert your PDF to other file types such as TXT, HMTL, RTF, etc. Type in your email address for Step 3 and click Convert.

file conversion

You should receive an email within a few minutes with a download link to your converted file. I have tried out this service on some pretty complex PDF documents with text in multiple columns, multiple images, etc and have been very impressed with it’s conversion accuracy.

Convert a PDF file to Excel format

We will again follow the steps above using Zamzar, but this time choose TXT as the format you want to convert to. Unfortunately, you can’t convert straight to Excel format, so we’ll have to go through the intermediary TXT format. Once you have downloaded the TXT file and saved it on your computer, open Microsoft Excel and go to File - Open and change the Files of Type combo box to All Files.

convert pdf to excel

Now you should see the converted text file in the list of files. Choose it and click Open. You’ll now be brought to the Text Import Wizard. You have to open the file in this manner because if you simply right-click and say Open With Excel, all of the text for each row will appear in the first column and not be separated.

For Step 1, choose Delimited from the two options listed.

convert pdf to word

Click Next and check off the Space checkbox as one of the delimiters. Each value should now be separated by a vertical line, indicating it’s going to be in a separate column.

convert pdf to jpg

Click Next and then click Finish. You can now save the file as an Excel file by going to File - Save As. There are a few drawbacks, however, as this conversion does not always work perfectly! For example, if the original Excel sheet had a column where there was text with spaces included, each word will be separated into it’s own column! Also, you won’t see any formulas or functions that may have been in the original Excel sheet, only the text.

It’s as easy as that! You can use many other image editing programs also such as Photoshop, Corel, etc, etc, but I chose Paint because that is universally available on just about every Windows computer.

How to change file icons in Windows

Looking for a way to change the default file icons in Windows? Windows XP has some decent icons for your shortcuts like My Computer

, My Documents, Recycle Bin, etc, but they are nothing very special. And after 7 years on the market, looking at those same icons over and over gets boring!

You can change the icons in Windows in two ways: manually by going to Properties or by using some icon tweaking programs. I’ll go through both methods just in case you prefer one over the other.

Firstly, you’ll need to have your icons ready that you want to use in place of the default icons. You can either download icons in .ICO format or download icon libraries (DLL), icon packages, or even know the executable file that contains the icons you want.

I’ve written several posts earlier on how to find icons and how to extract icons from EXE, DLL, and other file types, so read those posts first if you don’t already have a set of icons ready.

Change File Icon in Windows

So first, let’s go through the manual way of changing icons in Windows. There are two sets of icons: icons for file types and Windows icons, like My Computer, etc. Changing each set requires different steps. First let’s start out with Windows icons.

Step 1: Right-click on the desktop and choose Properties.

desktop properties

Step 2: Click on the Desktop tab and click on the Customize Desktop button.

customize desktop

Step 3: You’ll now see the default Windows icons in the scrollable box. It should contain My Computer, My Documents, My Network Places, and Recycle Bin (full and empty).

desktop items

Step 4: Click on any of the icons and choose Change Icon. You’ll now have the option to browse for icons, icon files, programs and libraries.

change icon

And that’s it! You’ve now changed the icon to something a little more to your liking hopefully!

Change File Type Icon in Windows

Now what about all those files? Whatever program you install on your computer always has some kind of icon associated with it. There is one that shows up on the desktop, one for the quick launch bar, etc. You can also change these quite easily.

Again, you’ll need to already have the icons ready before going through the next steps.

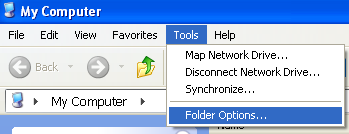
Step 1: Open My Computer and go to Tools and then Folder Options.

tool folder options

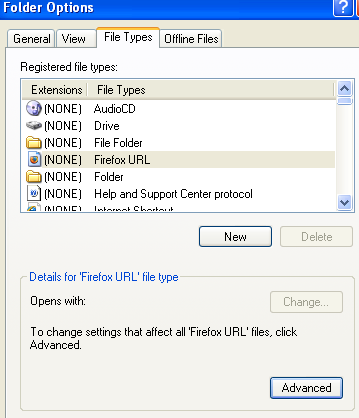
Step 2: Click on the File Types tab and you’ll see a listing of all the registered file types on your computer along with the extensions and the icon.

folder options

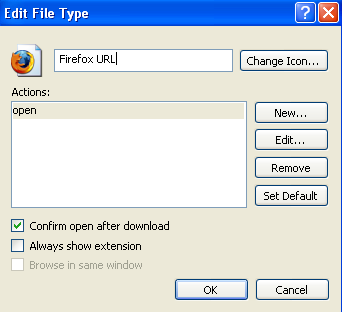
Step 3: Scroll down to the file extension you want to change the icon for and then select it in the list. After that, click on the Advanced button at the bottom of the dialog.

edit file type

Step 4: Click the Change Icon button at the top right and choose your replacement icon.

That’s how simple it is to change the file icons in Windows XP and Windows Vista. If you’re changing a bunch of file icons or the entire set of system icons, then this method could be quite tedious. In that case there are a couple of freeware programs you can try out to help make the process of changing file icons easier.

Icon Phile - Allows you to add homemade icons to your desktop.

ActivIcons - makes it simple to change properties for various icons on your Windows desktop and in Explorer, plus attributes for many other desktop settings.

IconTweaker - is a freeware application that allows you to customize all your Windows icons.

FileTypesMan - is an alternative to the ‘File Types’ tab in the ‘Folder Options’ of Windows that can also be used to change system icons.

WinIcon Customizer - is the standard way to change all the icons on your Windows PC.

Hopefully that’s enough to get your going on your journey to changing all of your Windows icons! Enjoy!

How to change the default program to open a file with

With so many great open source programs on the market, it’s pretty normal for people to use third party text editors, photo editors, etc instead of the default programs installed on Windows.

For example, when I double click on the TXT file, it always opens up in Notepad. That used to be OK, but now that I have installed Notepad++, an awesome text/code editor with tons more features, I would rather have all my text files open with Notepad++ instead of Windows Notepad.

So how can I change the default program for opening a particular file? Well there are two ways. I’ll first go through the easy method.

Method 1 – Use Open With Dialog

The easiest way to change the default launching program for a file type is to right-click on the file, click on Open With and click on Choose Program.

open with dialog

Now choose the program that you want to use to open files of this type. If it is not in the list, you can click the Browse button and go to the Program Files folder and click on the EXE file.

Once you choose the program, make sure to check the Always use the selected program to open this file box. Then click OK.

change default open program

That’s pretty much it, now any time I click on a TXT file, it will open using the program I selected in the Open With dialog.

Method 2 – File Types Dialog

The second method is to open My Computer, go to Tools, and click on Folder Options.

tools folder options

Now click on the File Types tab and scroll down to the file type extension you want to change, in my case TXT.

file types

Click on the Change button and the same dialog pops up like when you click Choose Program from the Open With menu. Go ahead and pick the program from the list and click OK.

You can do this for any file type on your computer, including pictures, sounds, videos, PDF documents, etc. I know that I prefer to use Foxit Reader over Adobe Reader any day because it’s so much faster. Enjoy!

Create your own CD and DVD labels using free MS Word Templates

If you frequently burn CDs like me for backup or as gifts to friends, you will always feel this need to have it with a nice CD label. With MS Word and your chosen free templates from MS Office Online, you can easily make custom CD labels, inserts, and booklets using popular templates from CD label brands like Avery.

Earlier I wrote about Dymo DisPainter, a cool inkjet CD/DVD label maker that allows you to burn your designs directly onto a CD, however, it costs quite a bit of money. If you want to create CD labels for free, read on!

To start making your own CD labels, choose a free template from any of the available templates from MS Office Online templates:

http://office.microsoft.com/en-us/templates/default.aspx

I put “DVD” on the search field to search for DVD covers (but you can search for “CD” or “floppy” too depending on what label you need to print):

image

Note that the icons next to each items designate the appropriate MS Office application that can open that template. In the two examples below, the first is a an MS Publisher template and second one is an MS Word template. If you don’t have MS Publisher but you have MS Word, get only the Word templates:

image

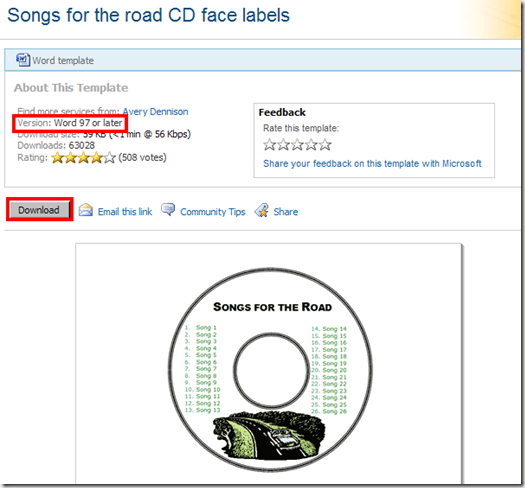
Next, download the Word template and check if it is compatible with your MS Word version. The “version” is shown on the download page:

image

Once you click download it will prompt the user to activate an ActiveX control from Microsoft. Just click OK to install the ActiveX control. You will only do this on the first download.

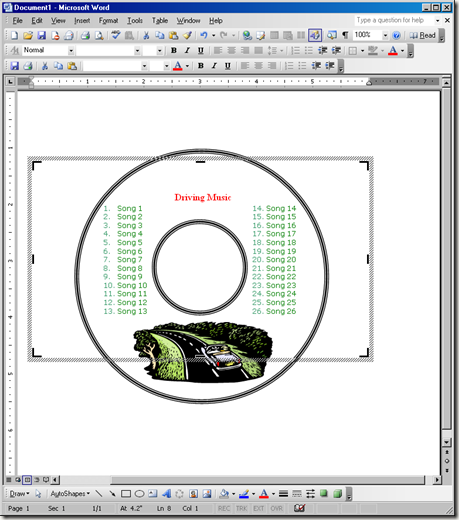
MS Word will open after downloading is completed. Downloading templates should be quick since they are only a few kilobytes in size. Using MS Word, you can customize the content before printing:

image

Make sure to checkout other designs for newer version of MS Word. The newer templates for MS Word 2003 and above look better and more contemporary:

image

Have fun choosing from the free online templates. You can add your own pictures and text on them like an ordinary MS Word document.

Flash Drive Protection- thumb drive antivirus antispyware

Today's security tip is a free anti-virus and spyware removal program for your flash drive. That's right, you can install and run not only an anti-virus program but anti-spyware as well. This is ideal if you go from PC to PC and use your Thumb drive like a floppy drive or CD-RW. There is a danger in connecting to a foreign PC. You're not in charge of its security, and you don't know how long ago the last security scan was run. If you connect to an infected PC and are unprotected, the chances of the virus attacking your system are great, to say the least. Stay protected.

AntiVir personal Edition
This anti-virus program can be installed and run directly from your flash media, stopping any viral attacks from an infected system. You have to make sure that it is up-to-date before plugging it in to a foreign PC but that should be the end of your responsibilities.

You can download antiVer personal Edition here. You just have to install it to your flash Drive (not the hard drive) to have it on hand no matter where you go.

Ad-Aware SE Personal Edition 1.06
I love this popular program's spyware-stopping capabilities, so installing it on my thumb drive brings me happiness beyond comprehension. So you connected to some dirty PC and got filth on your flash drive. This might be all right for them, but we have higher standards and cannot live with this malicious code on our system. Before you take your flash drive to your personal PC, of course you'll scan it. If you scan your drive before leaving that PC, you can know that you didn't just turn your flash drive into a malicious code carrier.
You can also scan other possibly infected machines from an uninfected source (your flash drive), so you might be able to get your buddy out of a jam and be the hero.

Note: When installing the ad-aware, install it directly to your PC's hard drive like you would any other program. Once installed, go to Start, Programs, Copy the Ad-Aware file, and Paste it into your flash drive.

You may be saying to yourselves, "Yeah. That's great, Chad, but why would I be carrying my card around plugging it into random PCs throughout the day?" Understandable, most people don't use their flash drives in this manner. After yesterday and next week's Downloads, you may change your tune and the way you use your flash drives. They're a huge asset, and some of these tricks are going to knock you socks off. So be patient and look for next week's download. Until then, stay safe out there.

Password Protect Folders in XP

Password Protect Folders in XP

Do you share a computer with other users and want some extra security on your folders? There are two ways to password protect a folder built into Windows XP (for other Windows flavors, there are some freeware/shareware programs out there).

#1 If you have a log in password for your account, this can be used to protect folders from other users. Your hard drive must be formatted using NTFS (which it probably is unless you're dual booting with another operating system). Here's what to do...

Right-click the folder that you want to make private and choose "Properties" (or Alt+Double-click). Go to the "Sharing" tab and check the "Make this folder private" box.

Click Apply . If you do not have a password on your account, a box will pop up asking if you want to assign a password. This must be done if you want to make the folder private, so click Yes . You will need to use your password to log on to your computer from then on.

Type in a password then confirm it. Click the "Create Password" button then close the Password window.

Click OK in the Properties dialog box.

Now anyone else logged on to your computer can't access that file without knowing your password.

#2 If the Folder is Zipped you can give it a unique password.

Just double-click the zipped folder. In the top menu select File then click "Add a Password".

Type a password into the Password box. Then again in the "Confirm Password" box.

Now, you are the only person who can access files in this folder. The folder can be opened allowing the files to be seen, but you are the only one who can access them.

Don't you feel more secure now?